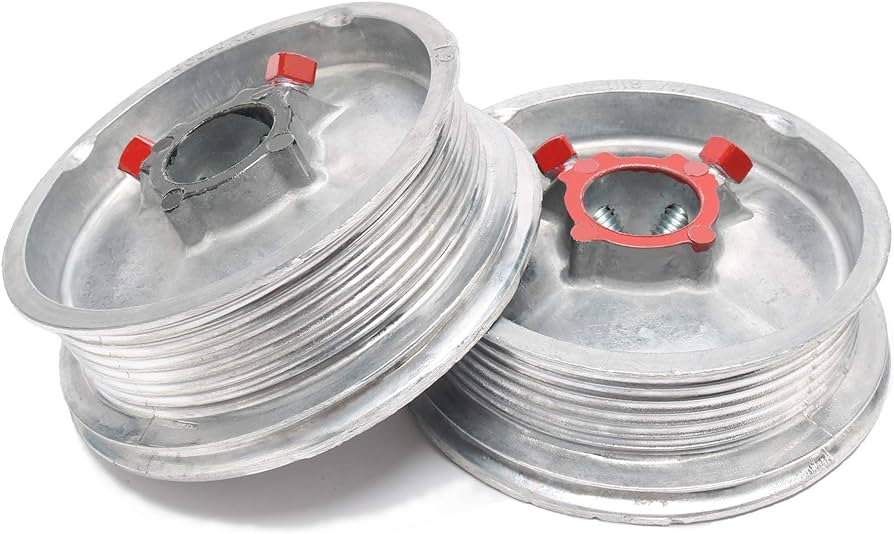
Replacing garage door cable drum is a critical part of your garage door’s mechanism. They manage cable movement, enabling smooth door operation. Mastering the role of these drums is vital for any homeowner maintaining door efficiency and safety.
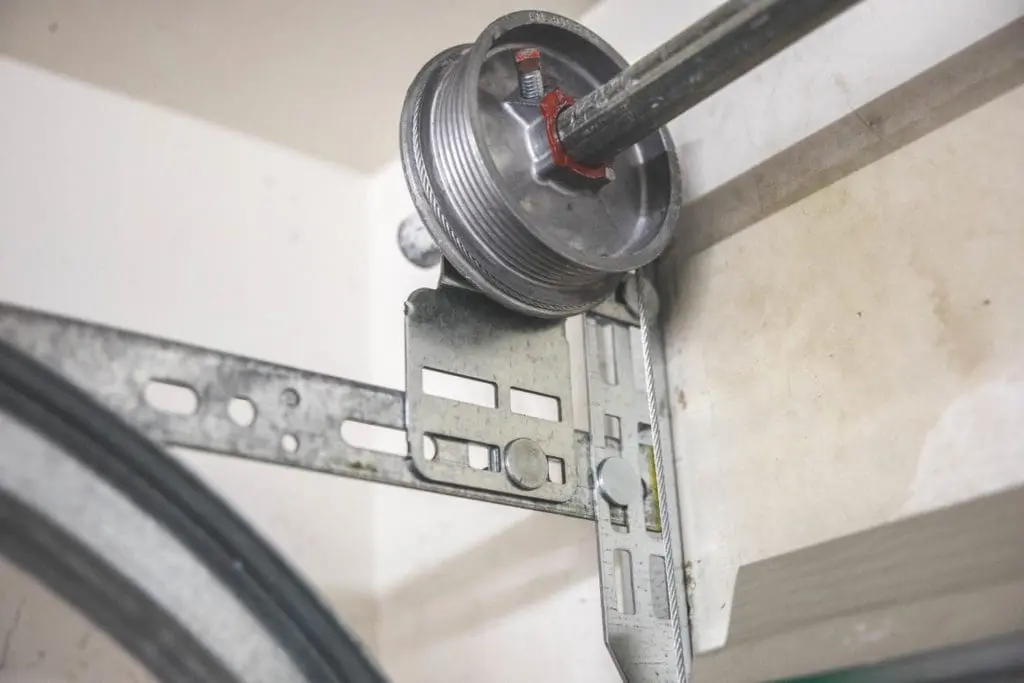
Garage door drums are typically located on each side of the door, near the top. They consist of a grooved drum that the cables wrap around. Without properly functioning cable drums, your garage door may become unstable, noisy, or even fail to operate altogether.
Understanding the Role of Garage Door Cable Drums

To comprehend the importance of garage door cable drums, it is essential to understand how they work. When you activate your garage door opener, the torsion springs create tension, which transfers to the cables. The cables, in turn, wind around the grooved drums. As the cables wind or unwind, the garage door either opens or closes, depending on the direction of rotation.
Garage door cable drums act as a spool that holds the cables in place and prevents them from tangling or becoming loose. They ensure that the cables wind and unwind smoothly, maintaining the proper tension throughout the door’s operation. Without functional cable drums, the cables may become tangled, resulting in uneven movement or a complete malfunction of the garage door.
Signs That Your Garage Door Cable Drum Needs Replacement
Over time, garage door cable drums may wear out or become damaged due to regular use or other factors. It is essential to identify the signs that indicate your garage door cable drums need replacement to prevent further damage or potential safety hazards. Here are some common signs to look out for:
- Uneven movement: If your garage door starts to move unevenly, jerks, or gets stuck during operation, it may be a sign of a worn-out cable drum. The uneven winding or unwinding of the cables can cause the door to become unstable, posing a safety risk.
- Excessive noise: If you notice unusual grinding, scraping, or squeaking noises when operating your garage door, it could indicate a problem with the cable drums. Worn-out or damaged cable drums may cause the cables to rub against the drum or other components, resulting in noise.
- Cable fraying or coming off the drum: Inspect the cables connected to the drum. If you notice frayed cables or cables that have come off the drum, it is a clear indicator that the cable drum needs replacement. Frayed or loose cables can compromise the safety and functionality of your garage door.
If you observe any of these signs, it is crucial to address the issue promptly by replacing the garage door cable drum to ensure the continued safe and efficient operation of your garage door.
Safety Precautions Before Replacing a Garage Door Cable Drum
Before embarking on the replacement of a garage door cable drum, it is essential to take certain safety precautions to protect yourself and prevent accidents. Working with garage doors can be dangerous, as they are heavy and under high tension. Here are some safety precautions to follow:
- Disconnect the power: Before starting any work on your garage door, disconnect the power to the opener. This will prevent accidental activation and ensure your safety.
- Wear protective gear: Always wear safety glasses, gloves, and sturdy footwear when working on your garage door. This will protect you from any potential injuries.
- Release tension from the torsion springs: To avoid the risk of the garage door unexpectedly springing open or closed, it is crucial to release tension from the torsion springs before attempting to replace the cable drum. This should only be done by an experienced professional to avoid injury.
Taking these safety precautions will help create a secure environment while replacing the garage door cable drum, minimizing the risk of accidents or injuries.
Step-by-Step Guide to Replacing a Garage Door Cable Drum
Replacing a garage door cable drum requires careful attention to detail and following a specific procedure. Here is a step-by-step guide to help you replace your garage door cable drum safely and efficiently:
- Gather the necessary tools: Before starting, gather the tools required for the job, including a replacement cable drum, winding bars, pliers, and a ladder.
- Disconnect the opener: Disconnect the power to the garage door opener and engage the manual release mechanism to disengage the opener from the door.
- Release tension from the torsion springs: This step is best left to a professional, as releasing tension from the torsion springs can be dangerous and requires specialized knowledge.
- Secure the door in place: Use clamps or locking pliers to secure the garage door in place, preventing it from accidentally moving during the replacement process.
- Remove the old cable drum: Detach the cables from the old cable drum and carefully remove the drum from the torsion tube. Take note of the direction in which the cables wind around the drum for proper installation of the new drum.
- Install the new cable drum: Place the new cable drum onto the torsion tube, ensuring it is properly aligned. Wind the cables around the drum in the same direction as the old drum.
- Reattach the cables: Carefully reattach the cables to the new cable drum, ensuring they are securely fastened.
- Reapply tension to the torsion springs: Again, this step should only be performed by a professional, as it requires precise adjustment and knowledge of the torsion spring system.
Following these steps will help you safely and effectively replace your garage door cable drum, restoring the proper functioning of your garage door.
Common Mistakes to Avoid During Replacement

While replacing a garage door cable drum, it is crucial to avoid common mistakes that can compromise the safety and efficiency of your garage door. Here are some mistakes to avoid:
- Skipping safety precautions: Neglecting to follow safety precautions can result in accidents or injuries. Always prioritize safety and take the necessary steps to protect yourself and others.
- Using incorrect tools or parts: Using the wrong tools or incorrect replacement parts can lead to improper installation and damage to your garage door. Ensure you have the correct tools and replacement drum that matches your door’s specifications.
- Improper cable winding: Winding the cables improperly around the drum can cause the door to operate unevenly or become unstable. Take note of the direction the cables wind around the old drum and replicate it when installing the new drum.
By avoiding these common mistakes, you can ensure a smooth and successful garage door cable drum replacement.
Tips for Efficient and Smooth Garage Door Cable Drum Replacement
To make the garage door cable drum replacement process more efficient and ensure a smooth outcome, consider the following tips:
- Consult a professional: If you are unsure about any aspect of the replacement process or lack the necessary experience, it is advisable to consult a professional garage door technician. They have the expertise and knowledge to perform the replacement safely and efficiently.
- Regular maintenance: To prevent premature wear and tear of your garage door cable drums, implement a regular maintenance routine. Lubricate the drums and cables periodically and inspect them for any signs of damage.
- Keep your garage door balanced: Properly balancing your garage door ensures that the cable drums wear evenly and prolongs their lifespan. Consult a professional to check the balance of your garage door and make any necessary adjustments.
By following these tips, you can make the garage door cable drum replacement process more efficient and maintain the longevity of your garage door.
Garage Door Cable Drum Adjustment Techniques
Garage door cable drum adjustment may be necessary if the door is not operating smoothly or if there are issues with cable tension. While minor adjustments can be made by homeowners, it is recommended to consult a professional for more complex adjustments. Here are some common techniques used for garage door cable drum adjustment:
- Cable tension adjustment: Adjusting the tension of the cables on the cable drum can help ensure smooth operation. This should be done carefully, as improper adjustment can lead to an unbalanced door or excessive tension.
- Drum alignment: If the cables are not winding or unwinding properly on the drum, adjusting the alignment of the drum can help resolve the issue. This requires careful adjustment and alignment of the drum on the torsion tube.
- Cable replacement: If the cables are worn, frayed, or damaged, replacing them can help improve the operation of the garage door. Ensure you use the correct type and size of cables for your specific garage door.
For more complex adjustments or if you are unsure about performing any adjustments yourself, it is best to seek professional assistance to avoid any potential safety risks or further damage to your garage door.
Professional vs. DIY
Deciding whether to opt for a professional or DIY garage door drum replacement depends on several factors, including your level of expertise, the complexity of the replacement, and your comfort with handling the task. Here are some considerations for both options:
Professional Garage Door Drum Replacement:
- Expertise: Garage door technicians have specialized knowledge and experience in handling various types of garage doors, including cable drum replacement.
- Efficiency: Professionals can complete the replacement quickly and efficiently, minimizing any disruption to your daily routine.
- Warranty: Many professional garage door companies offer warranties on their services and parts, providing peace of mind.
- Safety: Professionals have the necessary safety equipment and training to ensure the replacement is conducted safely.
DIY Garage Door Drum Replacement:
- Cost: DIY replacement can be more cost-effective, as you eliminate the labor costs associated with hiring a professional.
- Learning experience: If you enjoy hands-on projects and want to learn more about your garage door, DIY replacement can provide a valuable learning experience.
- Simple replacements: If the replacement is straightforward and you have prior experience working with garage doors, DIY can be a viable option.
Ultimately, the decision between professional and DIY garage door drum replacement depends on your comfort level, expertise, and the complexity of the replacement.
Conclusion
Replacing your garage door cable drum is a task that requires careful attention to detail, safety precautions, and proper knowledge of the process. By understanding the role of garage door cable drums and recognizing the signs that indicate replacement is necessary, you can ensure the continued smooth and efficient operation of your garage door.
Following the step-by-step guide, avoiding common mistakes, and implementing the tips provided will help you replace your garage door cable drum safely and efficiently. Remember, if you are unsure or lack experience, it is best to consult a professional to avoid any potential safety hazards or damage to your garage door.
Maintaining your garage door’s functionality and safety should be a priority for every homeowner. By taking the necessary steps to replace and maintain your garage door cable drum, you can enjoy a reliable and secure garage door for years to come.
For professional garage door cable drum replacement or any other garage door services, contact LMS Garage Doors today!


